Unlocking the Secrets of Professional Chocolate Tempering: Tips for Perfect Results Every Time
In the world of chocolate making, achieving the perfect temper is crucial for both aesthetic appeal and texture. According to a report by the Fine Chocolate Industry Association, nearly 70% of chocolate makers consider tempering a vital skill for producing high-quality confections. However, many struggle with the nuances of this process, often leading to subpar results such as bloomed chocolate or poor snap. This is where the expertise of a "temperatrice cioccolato professionale" comes into play, as they possess the knowledge and techniques necessary to consistently create flawlessly tempered chocolate. With the right guidance and tips, anyone can master the art of chocolate tempering, unlocking the secrets to professional-level results in their chocolate creations.
Understanding the Science Behind Chocolate Tempering Techniques
Chocolate tempering is a crucial process in chocolate-making that ensures a smooth, glossy finish and a satisfying snap when broken. Understanding the science behind tempering involves recognizing the structure of cocoa butter, which is made up of different forms known as polymorphs. Each polymorph affects the final appearance and texture of the chocolate. When chocolate is properly tempered, it stabilizes these crystalline structures, preventing unwanted bloom and ensuring that the chocolate sets correctly.
The process of tempering involves carefully heating and cooling chocolate to encourage the formation of stable crystals. By initially melting the chocolate to a specific temperature, then cooling it while stirring, chocolatiers promote the development of the desired polymorphs. The ideal temperature ranges will vary depending on the type of chocolate—dark, milk, or white—each requiring precise control to achieve optimal crystallization. Mastering this technique not only enhances the aesthetic appeal of the chocolate but also affects its flavor release and mouthfeel, making the science behind chocolate tempering a vital skill for any chocolatier.
Unlocking the Secrets of Professional Chocolate Tempering: Tips for Perfect Results Every Time
| Temperature Range (°F) |
Type of Chocolate |
Tempering Method |
Common Issues |
Solutions |
| 88-90 |
Dark Chocolate |
Tabling Method |
Blooming |
Ensure correct tempering temperature and stirring adequately. |
| 82-84 |
Milk Chocolate |
Seeding Method |
Dull Finish |
Use high-quality chocolate couverture and check temperatures. |
| 86-88 |
White Chocolate |
Water Bath Method |
Grainy Texture |
Avoid overheating and ensure proper mixing. |
| 90-92 |
Bittersweet Chocolate |
Direct Melting Method |
Poor Snap |
Ensure even temperature and avoid moisture. |
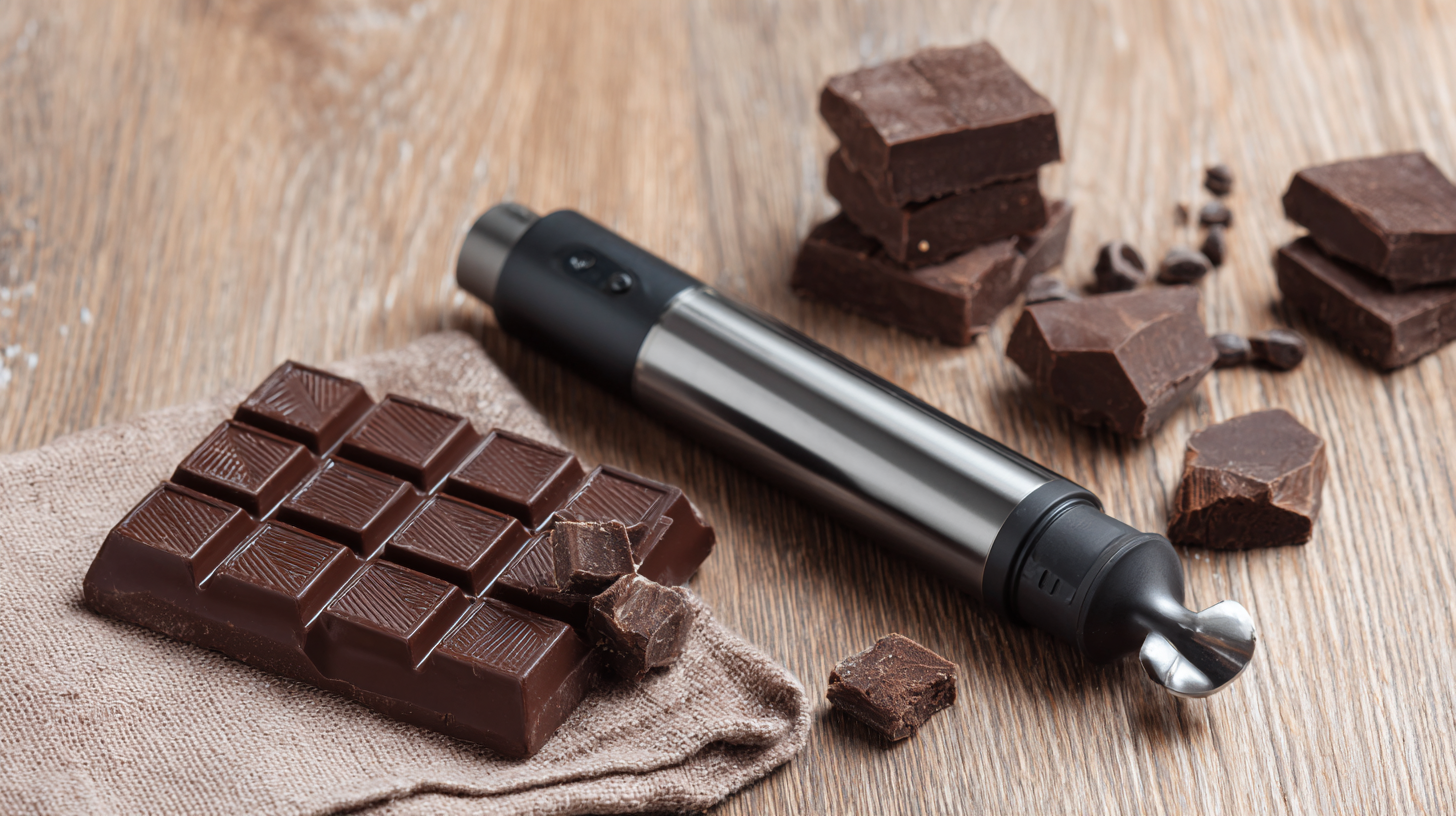
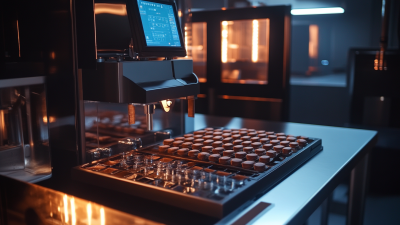
Essential Tempering Tools Every Chocolate Professional Needs
Tempering chocolate is an essential skill for any professional chocolatier, ensuring a glossy finish and a satisfying snap when the chocolate is broken. To achieve these perfect results, having the right tools is crucial. A high-quality thermometer, preferably digital, is fundamental, as it allows for precise temperature control, which is pivotal for maintaining the cocoa butter's crystalline structure. According to a study from the Fine Chocolate Industry Association, nearly 70% of chocolate professionals cite accurate temperature measurement as a key factor in their tempering success.
Additionally, a marble slab or a granite surface provides an excellent medium for tabling methods of tempering. This tool promotes even cooling and helps achieve the correct texture efficiently. Moreover, silicone spatulas are indispensable for scraping and spreading chocolate without scratching surfaces. An industry report highlights that 85% of successful chocolate businesses invest in specialized tempering machines that aid in maintaining consistency and efficiency in the tempering process. These tools collectively elevate the quality of chocolate products, allowing professionals to deliver exceptional confections to consumers.
Chocolate Tempering Techniques Comparison
This bar chart compares the time required for various chocolate tempering techniques including Tabling, Seeding, Direct Heating, and Microwave methods. Each method is represented in minutes, showcasing the efficiency of different tempering practices.
Five Common Mistakes to Avoid When Tempering Chocolate
When it comes to professional chocolate tempering, avoiding common pitfalls can make a significant difference in achieving that glossy finish and satisfying snap. One of the first mistakes to watch out for is failing to use a thermometer. Chocolate is sensitive to temperature, and tempering requires specific heat ranges to stabilize the cocoa butter crystals. Without a reliable thermometer, you risk overheating or underheating your chocolate, leading to a dull appearance and poor texture.
Another frequent error is not adequately preparing the workspace. Contamination from moisture or impurities can ruin the tempering process. It's essential to ensure that your utensils, surfaces, and even the chocolate itself are free from water and foreign substances. Lastly, patience is key; rushing the cooling or reheating phases can disrupt the crystallization process. Taking the time to carefully monitor each stage will ensure your tempering results in beautifully tempered chocolate every time.
Temperature Ranges for Different Types of Chocolate
When it comes to professional chocolate tempering, understanding the ideal temperature ranges for different types of chocolate is crucial for achieving that glossy finish and satisfying snap. Dark chocolate, for instance, should be tempered between 88°F to 90°F (31°C to 32°C). This temperature range allows the cocoa butter to stabilize, providing a firm texture and great flavor. Keeping the temperature consistent is key, as overheating can lead to a dull appearance and undesirable texture.
Milk chocolate, on the other hand, requires a slightly lower temperature, generally ranging from 86°F to 88°F (30°C to 31°C). The presence of milk solids in milk chocolate alters its crystallization process, necessitating careful temperature control. Finally, white chocolate, while often misunderstood as chocolate, should be tempered at 82°F to 84°F (28°C to 29°C) due to its unique composition without cocoa solids. Mastering these specific temperature ranges can transform your chocolate-making process, leading to confectionery masterpieces every time.
Quick Troubleshooting Tips for Perfectly Tempered Chocolate
Tempering chocolate is a critical process in achieving that perfect snap and glossy finish, but many novice chocolatiers encounter common pitfalls. Quick troubleshooting can elevate your results. According to a report from the Chocolate Manufacturers Association, improperly tempered chocolate can lead to unsightly bloom and a dull appearance, affecting both flavor and aesthetic. One primary issue arises from inadequate temperature control; maintaining the chocolate within specific temperature ranges—approximately 88-90°F for dark chocolate—is essential. If the chocolate begins to seize, gently reheating it can help restore its fluidity without compromising temper.
 Another frequent issue is crystallization. If your chocolate turns grainy, this could be due to the introduction of moisture. Data from the Confectionery Association suggests that water can disrupt the crystallization of cocoa butter, leading to undesirable texture changes. In such cases, the best remedy is to re-temper the chocolate or consider using a small amount of cocoa butter to rescue the batch. By understanding these troubleshooting tips, you can ensure consistently perfect results and create beautifully tempered chocolate every time.